HGTV's Decorating With Style
Project Instructions
Segment #357
Hannukah (or Any Other Kind of) Party Decorations
By Maude Gold Kiser
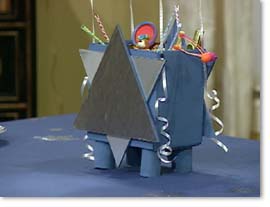
I appeared on HGTV's Decorating With Style several times back in the 1990s, and they asked me to do a segment on Hannukah decorations. I'm certain this was because I was the only guest they had on hand who was Jewish, but what the heck—I wasn't about to turn down another opportunity to be on TV. So, I came up with these projects for a Party Goodies Box and Sparkling Tablecloth, both of which can be adapted for any occasion. Sorry there's only a sideways picture of the box (copied from HGTV's site) and no picture of the tablecloth, but I forgot to take pictures before shooting the segment, and since they paid for the supplies, they got to keep projects. Please Click Here to see what I'm working on now.
You may have wondered why you see Hannukah spelled different ways. The fact
is that there are numerous spellings and all are considered correct. These
include Hanuka, Hannuka, Hanukkah, Hanukah, Chanuka, Chanukkah, Channukah,
Channuka, and Khaneke. Anyway you spell it, Hannukah in Hebrew means dedication.
Known as the Feast of Lights, Hannukah is celebrated in December (this year it begins on December 14th) by lighting one candle on the menorah on the first night, and adding an
additional candle each of the eight nights of the holiday. (By the way, the proper
way to do this is to add the candles from right to left and light them from
left to right.) Once lit, the tradition is to display the menorah in a
front window in order to share this light of freedom with the world. To read more
about Hannukah, and Judaism in general, visit this very interesting
site.
Hannukah is also celebrated with parties, games, and gifts, such as the
giving of gelt to the children. Sometimes this gelt is in the form of
money, little trinkets, or gold, foil-covered chocolate coins. (Although
these days Hannukah gelt has gotten much more expensive).
Party Goodies Box
|
This goodies box, filled with candy, small toys, and other trinkets, is a
great way to pass out gelt to your guests. Be sure to throw in some
"gold" coins, too (I always seem to be able to find them at big chain drugstores).
The box I did on the show had Stars of David on it, but it could be
menorahs or dreidels. This is also a fun idea for various other kinds
of special occasions. Just replace the star with the appropriate shape. This is also a great idea for teachers as a
reward box.
|
Supplies
A Box — Find one large enough to hold the appropriate amount of goodies.
Paint — I used Liberty Blue Apple Barrel acrylic paint (by Plaid).
I was trying to match the color blue in the Israeli flag. This came close,
but you might be able to do better.
Shellac — Optional
Foam-core board — This is a good use for a recycled piece of board,
since anything already on it wonĺt show.
Decorative paper — I used silver wrapping paper, but you could also
choose to use silver paint or any color paint or paper appropriate to the
occasion. You could also use one or a montage of pictures, instead.
Cardboard tube — You need a paper towel or other cardboard tube to make
little feet for the box.
Spray adhesive — I like 3Mĺs Super 77, but any kind will do.
Glue — This can be craft or hot glue which ever you prefer.
Foam brush
Exacto/craft knife
Balloons — Four helium-filled balloons with ribbons attached. I used
silver balloons with silver ribbons.
Sharpie Magic Marker — I like this kind, but any other would do.
Goodies — Toys, candy, cookies, or anything else you can think of.
How-tos
Step 1 — Paint the box inside and out. Acrylic paint has a flat finish. If you
prefer (which I do in this case) more of a gloss, give the box a coat of
either spray or brushed-on shellac. If you shellac the inside of the box,
too, you can fill it with cookies or unwrapped candy. (The shellac will
not only act as a sealer, but itĺs also the safest finish in the world and
appropriate for contact with anything edible).
Step 2 — Cut four equal sections of cardboard tube and paint them to match the
box. Then glue the feet to the bottom of the box with craft or hot glue.
The feet make the box tall enough to allow the lower point of the star to
extend below the bottom of the box. This would also be the case with a
heart or Christmas tree (the trunk would extend below the bottom). Other
decorations you might choose may not require these feet.
Step 3 — Cut four equal-sized triangles out of the foam-core board with an Exacto
knife. Or cut out two of any shape you choose. You want your decoration to
cover the whole side of the box as completely as your shape allows. It
should extend out beyond the edges of the box.
Step 4 — Paint the edges, as well as the backside of any parts of your triangles
(or other shape) that stick out further than the box (paint only the parts
that will show). Spray the unpainted side of each triangle (or other shape) with glue and
lay it down on the backside of the wrapping or other paper. (Unless youĺve
decided to paint them, in which case do that, or cover your shape with
pictures or any other decorations that appeal to you.)
Step 5 — Trim away the excess paper with the Exacto knife and smooth out any wrinkles
(working from the center toward the outside edges). Glue the
triangles together to form a star, then glue one star (or whatever) to each side
of the box.
Step 6 — Heap the box full of goodies; toys, candy, or any other party favor you can
think of. I stuck some Pixie sticks (straws filled with powdered candy) in
at the top to give some height to the contents of the box. Pencils, pens,
or anything else that would stick up would give the same effect. What to
fill the box with is only limited by the size of the box and your imagination.
Step 7 — Just before the party starts, thumbtack (tape or glue would pull the paint
off the box when you remove the balloons) one (or more if you like) balloon
to each corner of the box. Curl the ends of the ribbon that hang down around
the box, as well as the little piece up by the balloon. Write any appropriate
message on the balloons with Magic Marker (in this case, Happy Hannukah!).
|
How To Make An Equilateral Triangle
To make a Star of David correctly you need equilateral or equal-sided triangles.
It took me longer to get this right than it did to come up with the whole
project. So, I thought Iĺd include this for those who (like me) could use
a little trick to speed things up. I realize that pictures would make this
a lot easier, but if you read this twice it will make sense.
Step 1 — Draw a vertical line of any length.
Step 2 — Draw a horizontal line across the vertical line close to the bottom.
Step 3 — Mark the width you want the triangle to be on the horizontal line, with the vertical line as your center point. For example: To make a three inch
triangle, mark the horizontal line 1 1/2 inches out to the right and then
to the left of the vertical line.
Step 5 — Itĺs easier to do this next step if you donĺt start at the end of the ruler. To make a three inch triangle, line up one of your marks on the horizontal
line with the four inch mark on the ruler, line up the one inch mark where
it meets the vertical line, and draw a line that crosses both the horizontal
and vertical lines. Now, do the same thing from the other mark on the
horizontal line. If you do this right, the two angled lines should cross
right over each other on the vertical line. The whole thing will look like
a tee-pee and all three sides should be three inches long.
|
|
Sparkling Tablecloth
As with the goodies box, this technique could just as easily be applied to
other occasions. For Hannukah you could also cut your stamps into the shapes
of dreidels or menorahs. I chose the Star of David, because then the cloth
could be used for other holidays. Of course, you could also make this cloth using other shapes applicable to the occasion. You could also paint or stencil Happy Hannukah, Happy Valentine's Day, etc. right onto the cloth.
Even though this paint is washable it probably wonĺt hold up to repeated
washings. If you want to be able to use this cloth over and over, you may
want to consider leaving the area that goes over the top of the table plain
and just cover the sides with your decorations (which will also save you
some time). Then just cover the top of the table with another cloth that
hangs down around the edges about 8-10 inches (Iĺd use a white topcloth
over the blue for Hannukah). That way you can wash your topcloth and never
have to wash the decorated one.
Supplies
Tablecloth — I used a queen-sized blue sheet, but even at an outlet store it cost around $25.00. I did this to save time (and the show paid for it). A less expensive alternative would be to dye a cotton sheet (Israeli flag)
blue (or any color you choose). Or find a cheap blue (or other colored) tablecloth. Or use a white tablecloth (or sheet) and outline your silver stars in blue fabric paint (or make blue stars and outline them in the silver paint). Obviously there are plenty of possibilities here.
Fabric Paint — I used silver Tulip Glitter Fabric Paint (at crafts stores). This glitter paint also comes in several other colors. If you donĺt care about sparkles, any kind of fabric paint will work.
Mouse pad — A swell use for an old mouse pad or buy one at a
discount store.
Exacto/craft knife — To cut the stamps out with. You could also use sharp
scissors.
Sponge brush
How-tos
Step 1 — Be sure that your cloth is ironed, because it will be harder to
iron after itĺs been decorated.
Step 2 — Unless you have a really huge table, you have to work on this in sections. I accordion pleated the cloth widthwise and laid it over one end of my
dining room table, with about a two-foot single layer along one end. Then you just
unfold as you go. You have to slide the cloth back and forth (from side to
side) as you work. I hope you can envision this, if not, just make up
something that works for you.
Step 3 — Cover the area of the table youĺll be working on with wax paper and tape
it down. Donĺt use craft paper or newspaper, because the paint seeps
through the fabric and sticks to the paper (I learned this the hard way).
If you donĺt cover your table youĺll be sorry (also learned the hard way).
Step 4 — Make cardboard patterns of three different sizes of equilateral triangles.
I used one, two, and three inch triangles. Trace your pattern on the
mousepad and cut the triangles out with an Exacto knife or scissors.
Donĺt worry if the edges arenĺt perfectly straight as this doesnĺt seem
to matter.
Step 5 — Squirt some paint onto the rubber (not the fabric) side of the triangles,
and spread it out with a foam brush. The first coat on a new (or just
rinsed-out) stamp is a primer coat. Cover the stamp with a second coat and
then start stamping away. Stamp one triangle, then turn the stamp around and
stamp another triangle on top of the first one to form a Star of David.
Intersperse different-sized stars around your cloth. After making several
stars, the paint begins to build up on the stamp, so, rinse them out often.
To dry them after rinsing: lay the stamps on a terry cloth towel, cover with
another part of the towel, and press down hard.
Copyright ę1998-2007 by Maude Gold Kiser
The Gold-Kiser Company
Nashville, Tennessee
All rights reserved
